Thursday, April 28, 2011

Egg Salad

This is egg salad, in my opinion, the way it should be. It is fresh, light, and no one flavor overpowers the others. It is also a great way to use those hard boiled eggs from Easter. If you can get farm fresh eggs, they will make this recipe shine. Also homemade mayonnaise is incredible in egg salad and I think worth the trouble. If you have any kids at home it is a delicious way to teach them about emulsions and sneak some science into their day. Making mayonnaise is how my 7th grade science teacher taught my science class about emulsions and I still remember it some (undisclosed number of) years later.

Egg salad does not have to automatically become a sandwich. I like egg salad on crackers, on chips, in celery ribs, and on a bed of lettuce or spinach. My all time favorite way to serve egg salad is in a summer fresh tomato. If I am going to make an egg salad sandwich, I like go all out: egg salad, tomato, bacon, alpha sprouts and lettuce on potato bread (lightly toasted).


Egg Salad

The Whites from 6 Hard Boiled Eggs, Roughly Chopped
The Yolks from 3 Hard Boiled Eggs, Roughly Chopped
2 Ribs of Celery, Finely Chopped
2 Slices of Slab Bacon, Cooked until Crisp and Finely Chopped
Salt and Pepper, To Taste
2 Tbsp of Mayonnaise

Gently mix all of the ingredients together and eat.


The bottom line: will I make this again? Oh yes I will! As soon as the farmer's markets have fresh tomatoes I will be stuffing them with egg salad.

Monday, April 25, 2011

Red Curry Lamb

Red curry is my favorite curry. I love its flavor and its heat. It's my husband's favorite as well. Katie, our daughter, does not like any curry. Someday she will love curry; it is her destiny (she is a huge foodie). She just corrected me; she like curries that have less heat than the ones I make. Did I mention that I like spicy food? Correction, I like medium spicy food; not blow your head clean off spicy.

We had lots of left-over lamb from Easter so I went through the list of dishes I thought would be great with leftover lamb. The contenders were: tomato lamb pasta sauce, lamb fried rice, lamb hash, shepherd's pie, and lamb curry. We voted and the winner was lamb curry. I think Katie voted for the lamb curry because she wanted the cucumber yogurt mixture I make to serve with curries.

Red Curry Lamb

3 Tbsp Olive Oil
1 Cup (191 g) of Onions, Diced
1 Inch (2.5 cm) Piece of Ginger, Finely Chopped
4 Cloves of Garlic, Thinly Sliced
1 1/2 Tbsp of Red Curry Paste
14.5 Oz. (411 g) Can of Diced Tomatoes
13.5 Fl. Oz. (400 ml) Can of Coconut Milk
1 Tbsp of Lime Juice
1 Tbsp of Brown Sugar
1-2 Pounds (.45 - .9 kg) Cooked Lamb, Cubed
1/4 Cup (4 g) of Cilantro, Chopped

Heat the oil in a large deep saucepan, dutch oven, or skillet. Once oil is heated, add the onions, ginger, and garlic.

Saute stirring frequently until tender. Stir in the curry paste and saute (stirring frequently) until very fragrant. This step should take about 2 minutes. Next add the can of tomatoes with their juices and bring to a boil.

Add the lamb, coconut milk, lime juice, and brown sugar stirring until combined.

Lower the heat, cover, and simmer for 30 minutes. Serve over rice and garnish with chopped cilantro.

The bottom line: will I make this again? Yes, I will. Maybe next time I will use chicken or pork or maybe seafood. It is a great recipe.

Friday, April 22, 2011

Natural Egg Dyes

Our pretty natural dyed eggs
This year we decided to create natural dyes for our Easter eggs. I thought it would be fun and I also thought I could teach Katie some science. We had a lot of fun brainstorming what we were going to use as dyes. "What if we used..." seemed to be the question of the day. We tried to guess what color egg would result from each ingredient.
Also we had a discussion about vinegar - why we add vinegar to the colored liquid. Our discussion about vinegar and acids resulted in a fun experiment.  We took an egg (raw) and placed it in a jar of vinegar.
You can see the vinegar dissolving the calcium in the shell
It takes about 24-48 hours for the vinegar to break down the calcium in the shell of the egg. The egg becomes rubbery. It's awesome! I don't think Katie knew we were talking about chemistry and chemical reactions until it was too late.  She had already admitted that this was fun.
The result: a rubbery egg!
We had a lot of dyes to try, so we boiled ten eggs. The trick to boiling eggs without them cracking is to take a straight pin and poke a tiny hole in the broad side of the egg. It works. I promise. It lets the pressure out of the egg so as it boils it doesn't crack.

We chose the following:

Food processed spinach combined with water and two teaspoons of white vinegar.
I thought spinach would dye the eggs a darker green
 Beet juice, water, and two teaspoons of white vinegar.
The beet dyed eggs

Several tablespoons of chai tea, hot water, and two teaspoons of white vinegar.
We loved the chai tea dyed egg.

Crushed dandelion, hot water, and two teaspoons of vinegar.
The dandelion dyed egg was a light yellowish brown

One tablespoon of turmeric, hot water, and two teaspoons of white vinegar.
The turmeric dyed eggs were an intense gold
 A chuck of purple cabbage cooked in water and two teaspoons of vinegar (remove the cabbage after the water turns purple and before adding the vinegar).
Purple cabbage dyes the eggs a beautiful blue.
 It took our eggs two days in the jars of coloring liquid to dye to the colors we wanted. Katie was slightly disappointed because they didn't color immediately and she couldn't dip the eggs in multiple colors. I liked this process because we had to wait for the results and wonder what would happen. I was surprised at how great they turned out.

The bottom line: will we do this again? Yes, we will. Next year we will try different natural dyes and will write on the eggs with wax crayons before we dye them.

Thursday, April 21, 2011

I Love Coconut Bunny Cake

If you don't like coconut, you can still make this bunny cake. I know there are people out there that don't like coconut. I just don't understand it.

All that is required to make the bunny cake is two 8x8 (20 cm x 20 cm) round cakes. My mom used to make this cake for us using yellow cakes. Last year we used standard white cakes and butter cream frosting. Carrot cake with cream cheese frosting would be wonderful. Maybe we will make that next year.

This year I decided to make a coconut sour cream cake and cream cheese frosting. The sour cream makes the cake so so moist and the cream of coconut adds a subtle coconut flavor and a touch of sweetness. As a side note, cream of coconut makes the best Pina Coladas. I usually find it in the liquor department, but this time I found a squeeze bottle in the baking department. Oh happy day! A squeeze bottle of cream of coconut.

Sour Cream Coconut Cake

1 Box (18.25 oz./ 517 g) White Cake mix
1/4 Cup (60 ml) of Vegetable or Canola Oil
3 Large Eggs
8 oz (227 g) Sour Cream
1 Cup (250 ml) Cream of Coconut

Preheat oven to 350F/180C/Gas Mark 4. Grease two 8 inch (20 cm) cake pans and set aside. Mix all of the ingredients together until well blended.

Pour cake batter into prepared pans and bake for 27- 32 minutes or until toothpick inserted in center of cake comes out clean.

Cool 10 minutes before removing from pan. Cool completely before frosting.


Cream Cheese Frosting

8 oz (227 g) Cream Cheese, Softened
1/4 Cup (28 g) of Butter, Softened
1 Tsp of Vanilla
16 oz (454 g) of Powdered Sugar

Cream the cream cheese, butter and vanilla together and slowly add powdered sugar.

Cover a large cookie sheet, board, or piece of cardboard with foil. Place one round cake on the foil. Make a bow tie and ears from the other cake. I like to make a stencil from wax paper to cut the cake into ears and a bow tie. See diagram below.

Place bow tie below the bunny's head and the ears on top.

Ice the cake.

To decorate the ears, I took the ear stencil and cut out the area that should be pink and place over the ear. Next I filled in the wax paper with pink sugar. Then I took the part of the stencil that was cut out and placed it over the pink sugar. The last step is to cover the bunny in coconut.


The next part is the best part, decorating the bunny cake. (Katie had the idea of adding the licorice as hair).

Tuesday, April 19, 2011

Easter Lamb

Grilled Leg of Lamb
My husband and daughter love lamb. My daughter used to hate lamb, until she tried it. All it took was one bite and she was a convert. So when I asked them what they wanted for Easter dinner, the answer was a unanimous "lamb please." I usually convection roast my lamb but this time I decided to grill it. Steven was running errands so I was left with the grilling. I admit it -- grilling is not my strongest skill. But I was determined to grill the leg of lamb.

Once I started working on the grill, I kicked myself for failing to ask Steven to start the fire before he left. Have you ever noticed how hard it is to start a fire when you actually want one? Thankfully, we have a chimney (a metal cylinder used to start charcoal) and wax fire starter blocks. After a search through our garage, I found the chimney and the fire starters. I actually got the fire going. I was on a roll..... I know you are wondering, did I call Steven for advice? To be honest, I did have to call him once. (Yes, I did have to change some of the stuff I was doing). My husband is a minor grilling deity. (Which is why I don't have mad grilling skills). I had already gotten the fire going before I called him, so I thought that I was doing pretty well.
The grill is ready!
Grilled Leg of Lamb

The first step is the marinade. I like to marinate lamb overnight but if you have decided on lamb at the last minute, marinate it for at least for an hour. The longer you marinate the lamb, the stronger the flavor. I used a mustard-based marinade. I think this would also be great on pork.

Mustard Lamb Marinade:

 
Marinating lamb
1/2 C (120 g) of Dijon Mustard
5 Cloves of Garlic, Minced
1/4 C (60 ml) of Lemon Juice, Freshly Squeezed
1/4 C (60 ml) of Olive Oil
1 Tbsp of Rosemary, Chopped
1 Tbsp of Parsley, Chopped
1 Tsp of Kosher Salt
1 Tsp of Ground Black Pepper

Mix the ingredients together and rub onto the lamb. Loosely wrap the lamb in plastic wrap and place in the refrigerator.

Before grilling let the lamb sit for 30-60  minutes at room temperature.
Hot coals at last
Get your coals hot Hot HOT and place the lamb on the grill. I use a grill that has a good distance between the grate and the coals so I don't worry about flare ups (from the marinade dripping onto the coals). If you do not have a large distance between the coals and the grate, place a drip pan under the lamb and arrange the hot coals around the drip pan. 
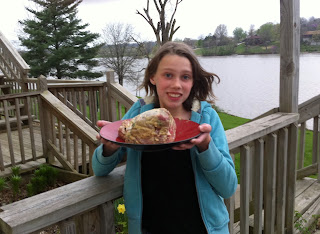
Katie with the marinated lamb
We like our lamb medium-rare so I wanted 140F/60C to be the final temperature. Grilled or roasted meats continue to cook after they are removed from the heat, so I took the leg out at 130F/54C. (The ranges for lamb are: rare: 135F/57C; medium rare: 140F/60C; medium: 160F/71C; well-done 165F/74C).
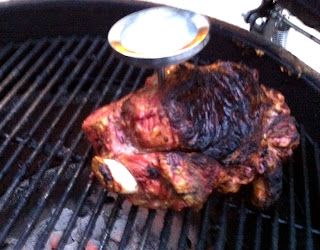
Grilling the lamb

I initially set the top and bottom vents on the grill to full open.  The extra air feeds the fire and drives the grill temperature up significantly.  The high temperature sears the meat, creating a crust and sealing in the juices.  Because a leg of lamb is a thick cut I grilled it with the cover closed, trapping the heat in and cooking it from all sides.  Once the bottom was seared (about 10 minutes), I turned the lamb and seared the other side. 

After the lamb was seared I closed the vents about three-quarters of the way, reducing the heat.  Once the lamb reached 130F/54C, I took it off of the grill and covered it.  I let it rest for approximately 15 minutes, during which the temp continued up to 140F/60C.  It took a 4 pound (1.8 kg) leg of lamb (bone in) about 1 1/2 hours to grill. The result: beautiful medium-rare lamb.
A beautiful crust on the lamb
 The bottom line: will I make this again? Yes, I will. I think that convection oven roasting or regular oven roasting is easier but there is something about grilling. I like the taste and (I can't believe I am saying this) the adventure of grilling.  I really liked the mustard marinade; I will be using that again. I may try it on pork tenderloin.

Monday, April 18, 2011

Chopped Salad

Chopped salad
To break our fast on Good Friday, I decided to make a meatless chopped salad. I thought it would be a great way to have fresh vegetables and I love chopped salad. I used my daughter's favorite salad dressing. It is an easy salad dressing to make and it is so good. You can add whatever vegetables are in season.

Dressing

1/3 Cup of Vegetable or Canola Oil
1/4 Cup of Seasoned Rice Vinegar
1 Tsp of Dijon Mustard
1 Clove of Garlic, Minced

Whisk dressing ingredients together and set aside.


Salad

1/2 Head of Green Leaf Lettuce (145 g), Chopped into Bite Sized Pieces 
1/4 Head of Cabbage (295 g) Chopped into Bite Sized Pieces
1/2 (40 g) of Sweet Onions, Diced
3/4 Cup of (120 g) of Tomatoes, Seeds Removed and Diced
3/4 Cup (100 g) of Cucumber, Seeds Removed and Diced
1 Cup (90g) of Mozzarella, Grated
1 Avocado, Diced


Chop all salad ingredients and toss with dressing.

Thursday, April 14, 2011

Pineapple Upside Down Cake

Pineapple upside down cake in all of its yummy glory
This is my mother's recipe for pineapple upside cake. I love this cake. Just the smell brings back wonderful childhood memories. It is so easy to make and it is incredible still warm from the oven.  You know it is a good recipe when the recipe card it is written on is covered with spills.

Pineapple Upside Down Cake

1/2 Cup (114 g) of Butter
1 Cup (213 g) of Packed Brown Sugar
1 20 oz. (567 g) Can of Sliced Pineapple, Reserve Juice
1 Yellow Cake Mix
6 Maraschino Cherries 
Ingredients for Cake Mix (Water, Eggs, Oil)

Preheat oven to 350F/177 C/Gas Mark 4. Melt 1/2 Cup of butter and pour into in a 13 x 9 (33 x 23 cm) pan. Sprinkle brown sugar evenly over butter. Arrange 6 pineapple rings over sugar. Decorate with maraschino cherries. The cherries should be place cut side up.


Make yellow cake mix according to box directions using juice for water in recipe. You probably won't have enough pineapple juice and will have to use some water.

Pour cake better over fruit.

Bake in preheated oven 45 to 55 minutes. Invert at once onto cake plate.
 
An alternative to the sliced pineapple (and equally good) is to eliminate the cherries and substitute a can of crushed pineapple for the rings.

Tuesday, April 12, 2011

Bread Salad

Bread salad
 After a hard day working in the garden, I wanted to use the herbs I planted and tended to. I had some leftover bread that needed to be used. It was an incredible loaf of bread- an oatmeal bread made with an oatmeal stout. You can use whatever bread you want. It is bread salad so choose wisely (no pressure!) Also the amounts are flexible, you add more or less of an ingredients. Or do what I do when I am not blogging, don't measure just add. My family loves this salad; they eat as much as I make. I can only imagine how good this is going to be with summer tomatoes....

Bread Salad

4 Cups of Stale Bread (205 g)
3 Tbsp of Fresh Herbs finely Chopped (I used Chives, Parsley, Rosemary and Thyme)
1/2 Cup of Good Quality Olive Oil
1/4 Cup of Vinegar (White Wine, Red Wine, or White Balsamic)
1 Cup (145 g) of Tomatoes, Diced
1 Cup (140 g) of Cucumbers, Diced

Toast the bread in a 325 F/165 C/ Gas Mark 3 oven for 10-20 minutes. Take out of oven place in a plastic bag and add olive oil, herbs, and vinegar.

Marinate for 20 minutes and then add tomatoes and cucumbers.


Marinate for 10 minutes and serve.

The bottom line: Will I make this again? Yes, especially since I seem to be going through a bread-making phase and I always seem to have extra bread.

Thursday, April 7, 2011

Chicken Lettuce Wraps

Chicken for the lettuce wraps
I love lettuce wraps. These are my favorite lettuce wraps. I like these more than those I get at a restaurant. Why? Because I have individualized them to my tastes- spicy. It only took me a couple of years to get it just right. This recipe is so easy, I almost didn't post it. The hardest part is the prep; once you have that done it's mere minutes until you have food on table.
I use skinless chicken thighs with this recipe. Please, please do not use white meat - it just won't be the same. Trust me. Ok. If you don't believe me- try it both ways and then come back here so I can say I told you so.
This is the medium spicy version. If you don't like spicy reduce the chile garlic sauce to 1 teaspoon (or use none at all). If you like it really spicy, increase the chile garlic sauce to two tablespoons. That much will blow your head clean off. But in a good way.

Chicken Lettuce Wraps

1-2 Pounds of Boneless, Skinless Chicken Thigh Meat, Cut into Cubes
1 Cup (80 g) of Fresh Mushrooms, Diced
8 oz. (227 g) of Water Chestnuts, Cut into Small Pieces
6 Cloves of Garlic, Minced
1 Tablespoon of Ginger, Minced
4 Tbsp of Hoisin Sauce
2 Tbsp of Oyster Sauce
2 Tbsp of Rice Wine Vinegar
2 Tbsp of Sesame Oil
1 Tbsp of Chile Garlic Sauce
3 Tbsp of Vegetable Oil
Cooked Rice or Lettuce Cups

Mix all of the ingredients together, except for vegetable oil. (This part can be completed up to 8 hours in advance).

To prepare, heat on high 3 tablespoons of oil in a large wok or skillet.  Add the chicken mixture to the skillet/wok and cook until done (approximately 5 minutes). Remove from heat.


Serve over rice or in lettuce cups. The bottom line: Will I make this again? Yes and without any changes. I love this recipe just the way it is.

Tuesday, April 5, 2011

Coconut Shrimp

Coconut shrimp
 I created this recipe back in 2000 and wrote the ingredients I used on a scrap of paper. That's it -- no amounts or directions. I had forgotten about the "recipe" until I had a craving for coconut shrimp. I went through my seafood recipe folder and found the oil stained scrap of paper. I think this is as close as I am going to get to the original recipe.

This is an easy stir fry with a bit of spice and a lot of sweetness (from the coconut). You can adjust the heat and the sweetness in this recipe by increasing or decreasing the coconut and red pepper. Make sure you have all of the prep work done before you heat up your wok because it goes fast.

Coconut Shrimp

1 Tbsp of Peanut Oil
2-3 Tbsp of Vegetable or Canola Oil
1 1/2 Inch (1/4 oz; 5 g) Piece of Ginger, Cut Up in Small Pieces
1 Red Bell Pepper, Thinly Sliced
4 Cloves of Garlic, Sliced
1 Tsp of Crushed Red Pepper
1/2 Cup (40 g) of Flaked Coconut
1/2 Cup (75 g) of Onions, Diced
3.5 oz. (100 g) Chinese Pea Pods
1 Pound (454 g) of of Shrimp, Peeled and Deveined
2 Green Onions, Thinly Sliced
Everything is ready to stir fry
Put the oil in a wok (or large skillet) over medium-high heat. Once the oil is heated, add the ginger, red bell pepper, garlic, red pepper, coconut, and onions.


Stir fry until onions are translucent. Add shrimp and pea pods. (You may need to add an extra
tablespoon of oil).


Stir fry until shrimp are done (approximately 4 minutes).

The finished dish
Garnish with green onions. Serve over rice.

The bottom line: Will I make this again? Yes. I am so happy I found the old "recipe" and recreated it.