Wednesday, November 30, 2011

Chocolate Chip Cookie Dough

I love chocolate chip cookies
 I love chocolate chip cookie dough. I buy pasteurized eggs so I can eat lots of raw cookie dough without worrying about salmonella. I feel kind of silly worrying about eating raw dough because I ate tons of it as a kid and never got sick. But then again food poisoning is awful. So pasteurized eggs it is. Next to raw dough, I like still warm from the oven melt in your mouth cookies. I don't really care for them as much once they have cooled.
I have a simple solution. I make cookie dough and refrigerate and/or freeze the dough. That way I can have freshly baked cookies whenever I want them.  To refrigerate the dough, form into the shape of a log and wrap in plastic wrap.
A log of cookie dough
 When the urge for warm cookies strikes, preheat the oven to 350F/176C/Gas Mark 4, slice the log into cookies, place on a cookie sheet, and bake for 11-13 minutes.
Ready to bake
To freeze shape into a log and freeze. Make sure that the dough log is well wrapped because the dough will soak up any odors from the freezer. To bake the dough, thaw in the refrigerator, preheat the oven to 350F/176C/Gas Mark 4, slice the log into cookies, place on a cookie sheet, and bake for 11-13 minutes. 
This also works for shortbread, peanut butter, refrigerator, and sugar cookies. Cookies that do not freeze well are meringue type, cake like cookies, and cookies with a liquidy batter (madeleines and tuiles).
To freeze drop cookies place the dough in heaping tablespoonfuls or teaspoonfuls (depending on the recipe) on a cookie sheet and freeze. Once frozen place in a plastic bag or airtight container and freeze. Take cookies as needed out of the freezer and defrost in the refrigerator and bake according to the recipe.
To freeze rolled cookies, roll out dough (to the thickness required in the recipe), place the dough between layers of parchment paper and freeze. Once frozen place in a container or wrap well. Defrost in the refrigerator, cut out cookies, and bake according to the recipe.

Sunday, November 27, 2011

Making My Own Sausage

Making sausage
Several years ago, my parents gave me a meat grinder attachment for Christmas. I love it. It is so easy to use. I use it to make the meat stuffing for pelmini and now my own sausage.
I decided to make sausage for the trifecta of pork.  I wanted to make porchetta style sausage with lots of fennel in the sausage (I love the taste of fennel). Katie does not like whole seeds in sausage, so I decided to grind them. I also ground the herbs and the garlic.

Italian Sausage
 2 1/2 lbs (1.1 kg) of Pork Shoulder, Cut into Thin Strips
3 Tsp of Fennel Seeds
2 Tsp of Freshly Ground Black Pepper
1 Tsp of Crushed Red Pepper
2 Tsp of Kosher Salt
4 Cloves of Garlic, Chopped
1/2 Tbsp of Fresh Sage
1/2 Tbsp of Oregano
1 Tbsp of Rosemary
1 1/2 Tbsp of Parsley

Place sliced pork shoulder in a large bowl. Finely grind fennel seeds, pepper, red pepper, and salt either in a spice grinder or mortar and pestle.
Spices ready to be ground
Pour ground spices into the bowl with the pork.
Fresh herbs
Grind the garlic and fresh herbs until a pesto-like consistency is achieved. Dump herb mixture into the bowl.
A bowlful of pork and spices
Run the pork through a meat grinder. With your hands mix the pork and run through the meat grinder again.

Cook one tablespoon of sausage in a small saucepan. Taste and adjust spices if necessary. Cook the sausage within three days or freeze.

The bottom line: will I make this again? Yes, I had no idea that making your own sausage was so easy. This way I control the amount of fat in my sausage and I control the seasonings. I ended up with a lean sausage with Italian seasonings. Homemade andouille sausage for gumbo is next on the list.

Friday, November 25, 2011

The Trifecta of Pork Porchetta Style

Sausage stuffed pork wrapped in bacon

 I admit it. This dish started out as a joke. I like to make nontraditional dishes for Thanksgiving. I wanted to do my own take on a Turducken; so, I decided on a three-pork roast. Porchetta style pork is perfect for this. A butterflied pork shoulder filled with pork sausage and wrapped in bacon. My own little pork version of a turducken. I am calling it a pork pork porkin. Catchy isn't it?
I have never made my own sausage. So this year, I decided to make my own sausage. It was easy to make and will be the subject of a later post. For safety reasons (Alton Brown would be so proud), I decided to cook it before stuffing into the center of the pork. I was worried that the temperature would not get high enough to fully cook the sausage without drying out the pork (ground pork needs to cook to a high temperature than a pork roast. (For more information see my post Recommended Temperatures for Pork)). Also cooking and draining the grease off of the sausage would keep the trifecta of pork from getting too greasy. I had a pork shoulder (Boston Butt) butterflied and I had three pieces of pork. I turned one into pork sausage and the other two I stuffed and wrapped in bacon. 

Butterflied pork shoulder

Stuffed Porchetta Style Pork

Stuffed pork
1 Butterflied Pork Shoulder
Approximately 1 Cup of Cooked Pork Sausage
4 Slices of Bacon

Sausage covered pork

The Rub
1 Tbsp of Fresh Herbs, Finely Chopped (Parsley, Sage, and Rosemary)
1 Tsp of Kosher Salt
1/2 Tsp of Freshly Ground Pepper
3 Cloves of Garlic, Minced
2 Tbsp of Olive Oil

Combine ingredients together and rub on porchetta style pork.
The rub


Stuffed Pork with Sausage and Apples
1 Butterflied Pork Shoulder
One Apple, Peeled and Diced
1 Tsp of Cinnamon
1/4 Tsp of Allspice
Approximately 1/2 Cup of Sausage, Cooked
4 Slices of Bacon

Apple and sausage covered pork

Assembly

A Whole Bunch of Toothpicks or Twine

Lay the butterflied pork shoulder flat and place stuffing on top of the pork. Starting at the outer edge, roll up like a jelly roll. If you are more coordinated than I am, secure with twine. I secured the pork with toothpicks. Wrap bacon around the roast. Rub the rub on the porchetta sausage stuffed pork. Refrigerate until ready to roast.
Assembled roasts


Roasting

1 Cup of White Wine
1 Onion Sliced

Preheat oven to 425F/218C/Gas Mark 7. Place the onions on the bottom of a baking pan, and place roasts on top of the onions. Pour wine into the bottom of the pan. Bake for approximately 1 hour and fifteen minutes or until temperature reaches 145F/63C. Let rest for 10 minutes before carving.
Roasted sausage stuffed pork wrapped in bacon


The bottom line: Will I make this again. There were a fair number of steps, but I broke them out over two days.The result, was some of the best pork I have ever had. The combination of the tastes was amazing. I could not decide which pork I liked better. It also resulted in a visually stunning dish. I will make this again.
Apple sausage stuffed pork

Tuesday, November 22, 2011

Chocolate Bourbon Pecan Pie

Slice of slightly heated chocolate bourbon pecan pie
November is the month for chocolate bourbon pecan pies. Every year for Thanksgiving I make one and about this time of year, I start craving them.
One year, I realized to my horror that there was no bourbon in the house. I was running behind in my cooking and meal planning, and the local grocery store only had Old Crow. So that year we had an Old Crow themed Thanksgiving. It was awesome. I had no idea you could put bourbon in so many dishes.

Pat in the Pan Pie Crust

Use your favorite pie shell or make this one. I am using a pat in the pan crust. Does it work? Yes. Is it good? Yes. Is it as flaky as the roll out crusts? No. But then it is not supposed to be flaky. I added ground nuts to the crust. I love nuts crusts. It does not have the edge of crust. On the plus side it I don't have to worry about my crust burning. Why am I using it? Because it is really fast and easy and I am stretched for time today. Oh and did I mention I like nut crusts?

1 Cup (125 g) of Unbleached Flour
1/4 Cup (32 g) of Pecans, Ground
1 Stick (226 g) of Butter, Softened

In a medium bowl, mix all ingredients until a soft dough ball forms. I use my hands to mix the dough.
Mixing the dough
Using lightly floured fingers, carefully press the dough into 9 inch (23 cm) pie pan. The dough should cover the bottom and the sides.
Dough patted into the pie pan
Filling

3 Large Eggs
1 Cup (200 g) of Sugar
1 Cup (240 ml) of Light Corn Syrup
5 Tbsp (72 g) of Unsalted Butter, Melted
2 Tbsp of Bourbon
1/2 Tsp of Salt
1 Cup (128 g) of Pecans, Toasted
1 Cup (170 g) of Milk Chocolate Chips

Preheat oven to 375F/190 C/Gas Mark 5. Whisk together the eggs, sugar, corn syrup, butter, bourbon, and salt until well blended.
Ingredients whisked together
Stir in the nuts and chocolate chips.
All that yummyness in one bowl
Warm the pie crust in the oven until it is hot to the touch. This takes about 4 minutes. Pour filling into the prepared pie crust.
Ready for the oven
Bake for 35 to 45 minutes until the edges are firm and the center seems set but quivery when the pan is nudged. Allow to cool and then refrigerate until the pie is cold and hard. Slice the pie and warm the slices in the microwave or in the oven (275F/135C/ Gas Mark 1) until the chocolate begins to soften.

The bottom line: Will I make this again? Yes, this is the best pie ever. This pie heralds the beginning of the holiday season for me. I will switch around the pie crusts I use based on my mood, but I don't mess with the filling.

Monday, November 21, 2011

Walnut Crescent Cookies

Rolling a crescent cookie in powdered sugar
 These are my favorite cookies frozen. Over the years, I have probably eaten my weight in frozen walnut crescents. I dearly love these. Of course, they are my mother's recipe. She makes dozens and dozens of these every Christmas. You would think I would get tired of them but I don't. Maybe it is because we only have them at Christmas.

Walnut Crescents

1 Cup (227 g) of Butter, Softened
1/4 Cup (28 g) of Powdered Sugar (plus more to roll the cookies in)
1 1/2 Tsp of Water
2 Cups (250 g) of Unbleached All-Purpose Flour
1 Cup (114 g) of Ground Walnuts

Preheat oven to 375 F/190C/Gas Mark 5.
Ground walnuts
Cream butter and 1/4 Cup (28 g) of powdered sugar. Add remaining ingredients and mix well.
Cookie dough- no raw eggs so you can eat the dough
Shape into logs 1/2 inch (1.3 cm) in diameter and cut into two inch (5 cm) pieces.
You can refrigerate the dough until ready to make the cookie. Just bring the dough to room temperature.
Shape each piece into a crescent, place on ungreased cookie sheet, and push ends down on sheet.
Ready for the oven
Bake for 10-15 minutes. Remove from cookie sheet and roll in powdered sugar. Once the cookies are cool, roll again in powdered sugar.
Rolling cookies in powdered sugar
The bottom line: will I make these again? Yes. I will probably make several batches of these cookies for Christmas. I can't wait until they are frozen and I can sneak into the basement and eat them out of the freezer. The only problem is the powdered sugar. I have to remember to dust it off my shirt or everyone will know I was eating cookies out of the freezer.

Sunday, November 20, 2011

Candy Cane Kiss Chocolate Thumbprints

Awesome cookies

I am crazy about the candy cane kisses. I love the look of them and the taste. I decided to create a cookie around them. I wanted them to be like my mom's peanut blossom cookie that she makes every Christmas. A peanut butter cookie would not go well with the mint so I switched to a chocolate thumbprint.
To keep the cookies from spreading the butter should be softened but not quite room temperature. The cookie dough should be refrigerated before baking. In addition, the cookie sheets should be cooled between each batch of cookies. I tried baking cookies on both cooled and hot baking sheets. The cookies on the warm cookie sheets spread more than the cooled cookie sheets.
I tried dark chocolate kisses, mint chocolate kisses, and candy cane kisses with these cookies. I preferred the candy can kisses.

Candy Cane Kisses Chocolate Thumbprints

1 Cup (2 Sticks, 225 g) of Butter, Softened
¾ Cup (175 g) of Sugar
¾ Cup (180 g) of Brown Sugar
2 Tsp of Vanilla
2 Eggs
2 Cups (240 g) of Flour
½ Cup (40 g) of Cocoa
½ Tsp of Salt
48 Candy Cane Kisses
Sugar (to roll the cookies in)

Cream butter, sugars, and vanilla until smooth. Add the eggs. In a separate bowl combine flour, cocoa, and salt. Slowly add the flour mixture to the butter mixture. Cover and refrigerate for at least an hour.
Remove foil from kisses.
Preheat oven to 350F/176C/Gas Mark 4. Cover a cookie sheet with parchment paper. Roll dough into one inch (2.5 cm) balls, roll in sugar and place on cookie sheet.

Rolling the dough ball in sugar
 These will spread so leave enough room between the cookies. Bake for 8 to 10 minutes. Remove from the oven and lightly press a kiss into the center of the cookie. Remove from the cookie sheet and cool.
A lovely plate of cookies
The bottom line: will I make this again? Yes, I love these. They will be added to the list of cookies I make each Christmas.

Saturday, November 19, 2011

Peanut Blossoms

Peanut blossoms
This is my mom's recipe. I love these cookies. We had and have them every year for Christmas. My mom usually starts making cookies after Halloween. The house smells like baking cookies for two months. It is a labor of love. I usually start making cookies right before Thanksgiving and make them for about a month.
These are usually one of the first cookies I make each year. They are easy to make and freeze well. How do I know? I made a career out of sneaking into the deep freezer and eating frozen Christmas cookies. I was not alone my father and brother were right there with me. Sometimes my mom had to remake cookies (sorry mom), but frozen cookies are really good. Sometimes I like frozen cookies more than defrosted cookies. Now that I have my own family, I make these every year for Christmas and my daughter and husband sneak into the deep freezer and eat frozen cookies. (Don't tell them but I do too).

Peanut Blossoms

1 3/4 (220 g) Cups of Flour
1/2 Cup (100 g) of Sugar
1/2 Cup (120 g) of Brown Sugar
1 Tsp of Baking Soda
1/2 Tsp of Salt
1/2 Cup (80 g) of Shortening
1/2 Cup (125 g) of Peanut Butter
1 Egg
2 Tbsp of Milk
1 Tsp of Vanilla
48 Chocolate Kisses
Sugar to Roll Cookies In

In a large bowl, combine all of the ingredients except the kisses. Beat until combined on low speed. 
So easy to make-just add all of the ingredients to the bowl
Cover and refrigerate for at least an hour.
Remove foil from kisses.

My job as a kid was unwrapping the chocolate kisses. 

Preheat oven to 375F/ 190C/Gas Mark 5. Shape dough into one-inch (2.5 cm) balls and roll in sugar. 
Place on ungreased cookie tray. Leave enough room because they will spread.

Cookies ready for the oven

Bake for 10 to 12 minutes. Remove from oven and place a kiss in the center of each cookie.
Carefully but quickly placing the kisses in the center of each cookie
Remove from tray. Once all cookies have been removed from the tray, lightly press on the top of the chocolate kiss.
Peanut blossoms

Cool completely. I pack these into cookie tins and freeze.  
The bottom line: will I make these again? Yes, every year for Christmas. I may add new cookies to the list each year that I make, but these will always be on the list.

Thursday, November 17, 2011

Porchetta Style Pork Roast

The roasted pork
 I decided that we are having pork tonight. Not just any pork but a porchetta style pork roast. Oh my goodness is this good. Actually, it is great. Porchetta is is traditional Italian dish. It originated in central Italy, but it is a popular celebratory dish throughout Italy. Traditionally, an entire pig is used. I am hungry, but not that hungry.
Instead I am using the traditional flavors for a roast. The traditional spices are fennel, garlic, sage, and rosemary. It should marinate over night, but I can't wait that long.
 Leftovers are amazing as pulled pork sandwiches. I try to make enough so there are leftovers.  I prefer the roast made in a convection oven; I think it makes a moister roast in the inside and a nice crispy exterior. I have included directions for both types of ovens.

Porchetta Style Pork Roast

6 Fresh Sage Leaves
2 Sprigs of Fresh Rosemary
2 Tsp of Fennel Seeds, Ground
4 Cloves of Garlic, Peeled
1 1/2 Tsp Kosher Salt
1 Tsp Black Pepper
2 Tbsp Olive Oil
1/2 Cup (120 ml) of White Wine

Preheat oven to 275F/135C/Gas Mark 1 (250F/120C/Gas Mark 1/2 convection). In a food processor or by hand grind the sage, rosemary, fennel, and garlic to make a paste. It will make you life easier if you pre-grind the fennel seeds. I want to kick myself when I forget. In a spice grinder (I use an old coffee grinder) pulse the fennel seeds a couple of times. Add the salt and pepper.
The rub
Cut about 10 1/4 inch (.6 cm) cuts all over the roast and insert about a  third of the spice mixture into the cuts.  Add the oil to the remaining and rub on the roast.
Ready for the oven
Roast in the oven for 2 hours (convection 1 hour and 30 minutes). Pour white wine over the pork and baste with juices. Continue roasting basting every 30 minutes for about 2 and half more hours (2 hours convection). Internal temperature should be 170F/77C and the outside of the roast should be brown and crispy. Let rest at least 15 minutes before slicing.

The bottom line: will I make this again? Oh yes.

Monday, November 14, 2011

Lemon Pepper, Udon, and Bacon Meal Madness!

An excellent meal
I spun the Food Wonk Meal Madness iPhone App, and I decided to create a dish with the omnivore spin: lemon pepper, udon noodles, and bacon.
My daughter's favorite noodle is udon. Not surprisingly, I was out of udon noodles, and I was seriously thinking of making my own. After much thought, I decided to make a trip to the Asian market. As long as I was going to the Asian market, a side trip to the farmer's market made sense. A couple of hours and many purchases later, I had an enormous amount of fresh produce and seafood.  It was time to create.

The difficult ingredient for me was the lemon pepper. I had trouble imaging how it was going to work with the udon and the bacon. I decided to take a risk and try something completely different (at least for me). It was Saturday and I had plenty of time. If the dish was awful I could come up with something else on Sunday.

I decided on sauteed shrimp sprinkled with lemon pepper in a coconut milk based broth over udon. I topped the dish with crumbled bacon. I ran my idea past several people and received several "that's interesting" responses. Katie made sure I had enough udon noodles for a different dish for her "just in case."

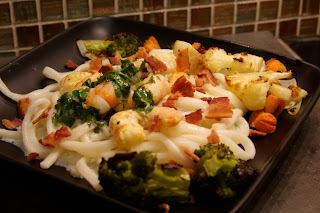
Was it good? I loved it. I was in foodie heaven. The different tastes worked together perfectly. The bacon, which I really worried about clashing with the rest of the dish, added that extra bit of yum. The lemon pepper worked great with the shrimp, and the coconut milk sauce was out of this world good. The only thing I would change is to add a bit of crushed red pepper to the sauce. I added it to the final version of the recipe. I also made roasted vegetables sprinkled with lemon pepper as a side. It was a bit chaotic, and I used a lot of pots. But I had fun making this dish. 
Roasted veggies; I love these
Bacon

4 Pieces of Bacon

Fry bacon until crisp. Crumble and set aside.

Coconut Milk Broth

2 Tbsp of Canola or Vegetable Oil
3 Cloves of Garlic, Minced
3 Green Onions, Thinly Sliced
1 Hot Pepper, Finely Chopped (I used a hot lemon pepper)
13.5 oz. (400 ml) of Coconut Milk
1/3 Cup (7 g) of Cilantro, Finely Chopped
1 1/2 Tsp of Sugar
2 Tbsp of Fresh Lime Juice
1/4 Tsp of Lemon Pepper
1/4 Tsp of Crushed Red Pepper (Optional)

In  a large saucepan heat oil and sauté garlic, onions, and hot pepper until tender.
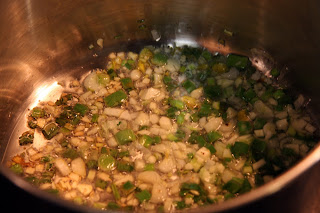
I love the  smell of sautéing garlic, onions, and peppers
Add the remaining ingredients and warm on low heat.
Warming over low heat
Udon Noodles

19.89 oz. (564 g) of Udon Noodles

Cook the udon noodles according to package directions.
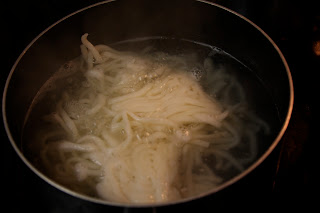
Cooking udon
Lemon Pepper Shrimp

2 Tbsp of Canola or Vegetable Oil
1 Tsp of Lemon Pepper
1 1/2 lbs (.7 kg) of Shrimp, Peeled and Deveined
A fresh shrimp
Heat oil in a skillet over medium heat. Sprinkle shrimp with lemon pepper. Sauté shrimp until pink about three minutes.

Beautiful sautéed shrimp


The Assembly

Place udon noodles on a plate and top with shrimp. Pour coconut milk broth over the shrimp and noodles. Finally top with bacon. I also placed the roasted vegetables around the udon noodles. I thought they went great with the dish.

The bottom line: Will I make this again? Yes, I loved this. I made the roasted vegetables again the next day. I had some leftover coconut milk broth and poured it over salmon for dinner the following night.

Friday, November 11, 2011

Meal Madness Challenge

It is time for another Meal Madness Challenge.  I must admit I feel a little goofy being video taped. Actually, more than a little goofy. Hopefully, the video will encourage you to participate in the Meal Madness Challenge.  (I'm already trying to come up with a dish...)
Here are the rules-- there are two spins one for omnivores and one for vegans. You can pick which spins you want to use. The challenge is to make a dish with all 3 ingredients. You can use any other ingredients you want. You can also place ingredients on a bed of spinach, rice, mashed potatoes, ect... and that counts as part of the same dish. Please let me know what you create by  leaving comments here or on the Food Wonk Facebook page. Or you can e-mail me photos at afoodwonk@gmail.com. I would like to have all your dishes by Sunday night but I will keep accepting and posting dishes for a week or so.


Ok here we go........ Here is the video of the spins (obviously not scripted):


Are here are the screen shots.
The omnivore spin. Not what I usually think of together but workable

The vegan spin. I am really liking this spin.
Good luck and please let me know what you create!