Tuesday, January 31, 2012

Everything is Better with Beer

Book Cover
I can't believe it but the appetizer cookbook is done. It is all about cooking with beer. It has 35 appetizers for humans and one for man's best friend. It is available on Kindle (Everything is Better with Beer) and is only $2.99-- a bargain!  It will be available in other venues soon.

Here is the list of recipes:

Beer Cheese Balls

Chipped Beef Beer Ball

Beer Ranch Cheese Dip

Hot Crab Dip

Bacon Beer Pimento Cheese

Beer Cheese Spread

Beer Con Queso Dip

Beer and Blue Cheese Dip

Blue Cheese Beer Dip II

Beer Cheese Fondue

Clam Dip in a Bread Bowl

Beer and Artichoke Dip

Onion Dip

Beer Steamed Clams

Mussels Steamed in Beer

Beer Marinated Shrimp

Sake Shrimp

Beer Roasted Garlic Shrimp

Beery Crab Cakes

Crab and Corn Fritters

Corn Fritters

Beer Batter Goodness

Mini Corn Dogs

Pigs in a Beer Blanket

Drunken Hot Dogs

Beer Meatballs

Awesome Baked Beer Chicken Wings

Beer Marinated Roasted Chicken Wings

Peanut Butter Chicken Wings

Beer Stuffed Mushrooms

Beer Marinated Mushrooms

Sake Marinated Mushrooms

Beer Marinated Olives

Spicy Beer Walnuts

Beer Edamame

Spent Grain Dog Biscuits

Friday, January 27, 2012

Mongolian Beef

Mongolian Beef
I love Mongolian beef. Mongolian beef is not really Mongolian at all.  It is a popular dish in Chinese restaurants in the United States. I think it is delicious. It is an amazingly easy dish to make at home.  I like it so much that I finally measured the ingredients and wrote down the amounts. You can adjust the seasoning and make it hotter. I slice the  steak while it is still slightly frozen (it is easier to slice that way). I start the rice before making the stir fry because the rice takes a lot longer to cook than the stir fry.

1/4 Cup of Soy Sauce (I use low sodium)
1 Tbsp of Hoisin Sauce
1 Tsp of Sesame Oil
2 Tsp of Canola or Vegetable Oil
2 Tsp of Sugar
4 Cloves of Garlic, Minced
Red Pepper Flakes or Sriracha Sauce, To Taste
2 lbs (.9 kg) of Sirloin Steak, Thinly Sliced
1 Tbsp of Canola or Vegetable Oil
4 Green Onions, Thinly Sliced

Combine the first seven ingredients together. Add the sirloin and marinate for one hour to overnight.
Marinating beef
Heat the oil (I add a couple of drops of sesame oil) to a large skillet or wok over high heat.
Stir frying the green onions
Add the green onions and stir fry for about seconds and then add the beef and marinade. Stir fry until the beef is no longer pink about 5 minutes.
Stir frying the beef
Serve over rice.

The bottom line: will I make this again? I love this. Yes. Probably this weekend. So easy and so yummy...

Monday, January 23, 2012

Chinese Dumplings-Porcupine Balls

Porcupine Balls
The Chinese New Year is here. Happy New Year! This year (2012) is going to be the year of the dragon. The dragon is the most favorable and revered sign in the 12-year Chinese zodiac. The dragon is a symbol of royalty, fortune and power. I am hoping it is a good year, no make that a great year. To celebrate the new year, I decided that dumplings were necessary. When I asked my family which dumplings they wanted,  the resounding reply was porcupine balls or pearl balls. I was happy to oblige; they are incredibly easy to make. I also think they are so so tasty. I have never made these without a streamer so if someone makes them without one, please leave a comment and let me know how. The rice that should be used in these is glutinous rice. It is also called sweet or sticky rice and is available at Asian markets. If you cannot find glutinous rice then use a short-grain rice instead. Please note, that the rice is soaked and then steamed with the pork. It is never boiled. I like a bit of spice so I add a squirt or two of Sriracha sauce.

1 Cup (210 g) of Uncooked Rice
1 Pound (.45 kg) of Ground Pork
2 Tbsp of Soy Sauce
1/2 Tsp Sugar
1/2 Tsp of Ground Ginger
1 Large Egg
1 Scallion Finely Chopped
Sriracha Sauce (Optional), To Taste

Soak the rice in water for at least 3 hours, preferably overnight.
Soaking rice
Lightly grease the bottom of the steamer. Dump remaining ingredients into a bowl and mix to combine.
Ready to mix
Form the pork mixture into small balls. Drain rice and roll the pork ball in the rice mixture.
The assembly line is ready
Place the pork balls into the steamer.
Ready to be steamed
I use a large skillet and I place the steamer in the large skillet. Next I fill the skillet with boiling water so that the water comes up the side of the steamer. Watch the level of the water and add more boiling water if the level gets low.
Steaming
Turn the stove on high and steam for 15-20 minutes until the pork is cooked though and the rice is tender. I use a meat thermometer just to be sure (Since this is ground pork, the recommended temperature is 160F/71C).
Perfection
The bottom line: Will I make these again? Yes. They are incredible. I am sure that I will be branching out into other steamed dumplings......

Friday, January 20, 2012

Praline and Cream Cheese Filled King Cake

The "king cake" gets its name from the three kings in the bible who traveled to visit baby Jesus. King cakes are traditionally eaten between the Ephinany (the feast day celebrating the visit of the three wise to baby Jesus which symbolizes the presentation of Jesus to the wider world) through Mardi Gras (Fat Tuesday- the day before Ask Wednesday and the beginning of lent).
Each king cake usually has a small plastic baby, nut, or bean symbolizing baby Jesus. Depending on where you live, the person who gets the piece of cake with the "baby" has to have the next party, supply the next cake, is declared king or queen for a day, is going to have a baby, or has to prepare tamales for the Candlemass feast. The cake is decorated in traditional Mardi Gras colors: green (faith), gold (power), and purple (justice).

My favorite king cakes are the filled cakes. When I lived in New Orleans, I never thought to make a king cake because it was so easy to buy one. Like everyone else in New Orleans, I had my favorite bakery and I ate lots of king cake. Now I have two options for king cake, I can have one shipped or make my own. I decided to make my own that way I can fill my king cake with cream cheese and pralines. Yum! These cakes are not difficult at all to make. The dough is so easy to work with. I would like to tell you that these take no time at all. That would be a lie. It took me most of a day to make this cake. While a lot of that time was the cake rising, you should plan on four plus hours from start to finish.


King Cake
2 1/4 Tsp (One Packet) of Yeast
1/2 Cup (120 ml) of Milk
6 Tbsp of Butter, Softened
2 Tbsp of Sugar
1/4 Tsp of Salt
1 Egg, at Room Temperature
1/2 Tsp of Cinnamon
1/2 Tsp of Ground Nutmeg
2 1/2- 3 Cups (300g to 360g) of Flour

In a small saucepan heat the milk to 100-110F/38-43C. Pour the milk into your mixing bowl and add the yeast and the sugar. Let the yeast mixture sit for 10 minutes or until foamy. (If the yeast does not react throw out the yeast mixture and start again).

In a small bowl, beat the egg and add to the yeast mixture. In another small bowl combine the flour, spices, and salt. Add the butter to the egg/milk mixture, turn on the mixer and gradually add the dry ingredients. I add 2 1/2 cups (300 g) of flour and once it is combined, I switch to a dough hook and mix the dough until a soft ball forms. Up to 1/2 cup (60 g) of flour may need to be added (a small amount at a time) for the soft ball to form.
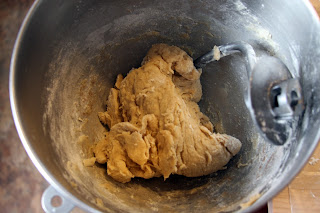
The dough has formed a soft ball and is ready to knead
Knead the dough on a lightly floured surface until the dough is soft and smooth. This process will not take long. It takes me less than a minute.
Kneaded dough ready to rise
Place the dough in a lightly oiled bowl and roll the dough in the bowl so the dough ball is covered in oil. Cover the bowl with plastic wrap, place in a warm area (free of drafts), and allow the dough to rise for about an hour or until the dough had doubled in size. Sometime this can take up to an hour and a half.

While the dough is rising, make the fillings and sugar (see recipes below).

Once the dough is ready, punch the dough. Place on a lightly floured surface. I like to use parchment paper so then I can transfer the dough on the parchment paper to a cooking sheet without messing up the dough. Roll the dough out into a rectangle. Place gobs of the cream cheese and praline mixture on one half of the rectangle (do not use all of the fillings). Keep the filling away from the edges of the cake otherwise you will have filling oozing out while it bakes.
Rolled out dough with gobs of filling
Fold the rectangle in half and crimp the edges.
Folded dough
Place more gobs of the fillings on half of the rectangle and fold and crimp the edges.

Folded dough with gobs of filling
(I prefer gobs to thinly spreading the fillings over the entire surface because I like pockets of filling in the cake not a thin layer throughout).
Folded dough ready to form into an oval
Shape the rectangle into a round or oval shape. Place a greased coffee can in the center of the king cake.
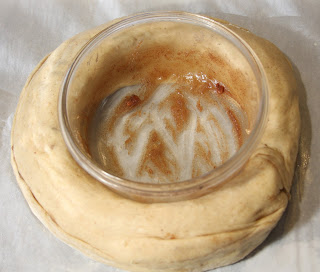
Rising king cake
Cover with plastic wrap, place in a warm spot and allow to rise for 45 minutes.
Ready for the oven
Preheat your oven to 375F/190C/Gas Mark 5. Remove the coffee cans and bake for 15-20 minutes or until slightly brown. Place plastic baby or almond in the cake by placing a small split in the bottom of the cake and inserting the plastic baby or almond.
Iced king cake
Make the icing. Ice the cake and while the icing is still wet, pour the sugar on top.

Cream Cheese Filling
8 oz (227 g) of Cream Cheese
1/4 Cup (50 g) Sugar
1 Tsp of Vanilla

Combine cream cheese, sugar, and vanilla and beat until creamy.

Praline Filling

1 Cup (128 g) of Pecans
1/4 Cup (56 g) of Butter, Melted
1/2 Cup (120 g) of Packed Brown Sugar
1/2 Tsp of Cinnamon
1/4 Tsp of Nutmeg

Mix all of the ingredients together.
Mmmmmm praline filling
Icing

1 Tablespoon of Butter, Melted
2 Cups (230 g) of Powdered Sugar
2-4 Tablespoons of Half and Half or Cream
1/2 Tsp of Flavoring, Optional


Sugar


Sugar
1-2 Drops of Food Coloring

Place the sugar in a plastic bag and add one drop of food coloring and rub the sugar and the food coloring together. Add one drop of food coloring at a time until desired color is reached.
Gold sugar
The bottom line: will I make this again. Yes, I have one more to make this season and then I am done until next year. These are time intensive cakes with lots of steps. Of course, if I was happy with a regular king cake it wouldn't take so much time. Are they worth the time, yes. Having made two, am I glad I only have one more to make? Yes, yes I am.

Tuesday, January 17, 2012

My Favorite Meatballs

Spaghetti and meatballs
Katie loves spaghetti with sweet tomato sauce and meatballs. I do too. These are my favorite meatballs. It is the bread soaked in milk that makes the difference. These are amazing and so easy to make. Make sure that you use a good quality bread. I like to use potato bread. If we ever had any left over I would freeze them.

Meatballs
2 Pieces of Bread
3/4 Cup (180 ml) of Milk
2 lbs (.9 kg) of Ground Beef
1 Egg
1/2 Tsp of Salt
1/2 Tsp of Black Pepper
1/2 Tsp of Garlic Powder
1 Tsp of Dried Parsley

Preheat oven to 400F/204C/Gas Mark 6. Tear the bread into pieces and place it in a bowl. Pour the milk over the bread. Let the bread soak up the milk for approximately 5 minutes.

Bread and milk
Rub the bread into small pieces. Add the remaining ingredients and mix until well combined.
All ready to be mixed
Form into small meatballs and place on cookie sheets.
Meatballs ready to be baked
Bake until cook though about 20 minutes.
Lovely meatballs
The bottom line: will I make this again? Yes these are the best meatballs ever.

Friday, January 13, 2012

Orangecello

Zesting a clementine
I love limoncello. When I started making limoncello, one of my friends told me that she had made orangecello. She told me that it was great. I noticed clementines were on sale at the grocery store. They are so delicious. I bought two small crates. I decided to turn one crate into orangecello.


Orangecello

1 Bottle (750 ml) of Vodka
16 Clementines or 8 Oranges

Zest in a jar
Wash the clementines or oranges. Carefully zest the clementines or oranges and place the zest in a large glass container. I use a mason jar. Pour in the vodka. Store in cool dark place for 1 to 2 weeks, shaking the jar every couple of days.

Vodka and zest
Orange Simple Syrup
Straining orange juice
5 Cup Water
4 Cups Sugar
1 Cup Orange Juice, Strained
Orange simple syrup

In a medium saucepan, combine the water and sugar. Heat until the sugar is completely dissolved.  Let the mixture cool completely and add the orange juice.

Zest and vodka
Making Orangecello

Pour the vodka and zest through a strainer into a large bowl. Add the orange simple syrup and pour into bottles. Refrigerate and enjoy!
Finished orangecello
The bottom line: will I make this again? Yes. Yummy. I may like limoncello more but it is a close call.

Tuesday, January 10, 2012

Candied Bacon

Candied bacon
As you might have guessed from my blog, I really like food. I like all kinds of food. Are some foods more equal than others? (I couldn't resist the Animal Farm reference; we are talking about bacon). Sure-- but just as the seasons change, my tastes change. In summer, I crave light fresh veggie-filled foods. In the winter, I usually want heartier fare. No matter which season it is, I am always in the mood for bacon. I am crazy about bacon. It is delicious. I guess it's true pigs are more equal.
I usually add bacon in small amounts to a dish. So when I went to a New Years Eve party and my friend Cristi brought candied bacon, I was in heaven. It was so so yummy. When we had a party to go to, I decided to make candied bacon, pepper candied bacon, and cayenne candied bacon. It is amazingly easy to make. I decided to use some of the maple cured bacon that I received as part of the half of hog we bought from a local farmer.
I decided to make it using two different methods: (1) on a broiler rack and (2) between two cookie sheets. I am curious to see which method works better. I made the candied bacon first and decided to add maple syrup to the mixture because the bacon with just brown sugar wasn't "candied" enough.

Candied Bacon

1/3 Pound (135 g) of Bacon
1/3 Cup (70 g) of Brown Sugar

Preheat your oven to 325F/162C/Gas Mark 3. (The convection setting would not make a difference with the cookie sheet method).  Place a piece of parchment or foil on a cookie sheet. Toss the bacon with the brown sugar. Place the bacon on top of the foil or parchment paper and top with any remaining brown sugar.
Brown sugared bacon
Top bacon with another piece of foil or parchment paper and cover with the second cookie sheet. Place in the oven and bake for 20 minutes. After 20 minutes, check the bacon if it is golden brown and crispy remove to a plate. If it is not crispy cook for additional 5 minute intervals.

Spicy Candied Bacon

1 Pound (.45 kg) of Bacon
1/3 Cup (70 g) Brown Sugar
1/3 Cup (80 ml) of Maple Syrup
1/2 Tsp Cayenne Pepper

Preheat your oven: regular oven 325F/162C/Gas Mark 3 and convection 300F/149C/Gas Mark 2. I used the convection oven setting.  Grease a broiler pan. Combine the brown sugar, maple syrup, and cayenne.
Brown sugar, maple syrup, and cayenne. 
Slather the bacon in the maple syrup mixture. Place on greased broiler pan. Bake 10 minutes and flip the bacon and turn the broiler pan.  Bake for another 10 minutes and flip the bacon. Bake at 5 minute intervals until the bacon is golden brown and crispy. Baking times will vary based on the thickness of your bacon.


Pepper Candied Bacon

1 Pound (.45 kg) of Bacon
1 Tsp Pepper
1/3 Cup (70 g) of Brown Sugar
1/3 Cup (80 ml) of Maple Syrup

Preheat your oven: regular oven 325F/162C/Gas Mark 3 and convection 300F/149C/Gas Mark 2. (I used the convection oven setting).  Grease a broiler pan. Combine brown sugar, maple syrup, and pepper.
Maple syrup, brown sugar, and pepper
Slather the bacon in the maple syrup mixture. Place on greased broiler pan. Bake 10 minutes and flip the bacon and turn the broiler pan. Bake for another 10 minutes and flip the bacon. Bake at 5 minute intervals until the bacon is golden brown and crispy. The baking time depends on the thickness of your bacon.
Slathered bacon ready to bake
The bottom line: will I make this again? Oh my goodness yes. I could have eaten all myself. I also made this with bacon pieces (ends).
Bacon pieces
Also amazing. I liked the broiler pan/convection oven method better than the two cookie sheets. I could not decide if I liked the peppered bacon or the cayenne bacon more. Next time I will add more cayenne.

Friday, January 6, 2012

Orange Peel Beef

A bowl of orange beef
I have been on an Asian food and orange kick lately. I decided to make orange peel beef (well I used clementines). I love the spicy sweetness of orange peel beef. Since I have a box of clementines and half of cow in my deep freeze all I had to do was defrost the beef. I guess I should clarify- we have half of a side of beef (already processed). We bought it from a local farmer and it is wonderful beef.
For this stir fry, like any stir fry, make sure all your ingredients are chopped and ready to go before starting the dish. I let the beef marinate in the water and corn starch mixture while I prepared the remaining ingredients. One more note, I made this dish for the entire family so I toned down the spice. If I was making it for just Steven and me, I would have added about a teaspoon of crushed red pepper.

Orange Peel Beef
1 lb (.45 kg) of Beef, Thinly Sliced (I Used Sirloin)
2 Tbsp of Soy Sauce
1 Tbsp of Cornstarch
1/2 Cup (120 ml) of Freshly Squeezed Orange Juice
1 Tbsp of Soy Sauce
2 Tsp of Sugar
1 1/2 Tsp of Corn Starch
1/2 Tsp of Chili Garlic Sauce
2 1/2 Tbsp of Vegetable or Canola Oil, Divided
1/4 Tsp of Red Pepper Flakes or Several Chiles
1/2 of a Small Onion (60 g), Thinly Sliced
1/4 Cup (15 grams/1/2 of a Clementine) Orange Peel, Thinly Sliced
2 Cups (370 g) of Uncooked Rice, Cooked According to Package Directions

Combine soy sauce and corn starch. Toss with meat to coat and let sit for 10 minutes.  In a separate bowl make the sauce by combining the orange juice, soy sauce, sugar, corn starch, and chili garlic sauce. Set aside.
Orange sauce
In a large skillet or wok over medium high heat, heat 2 tablespoons of the oil. Add the beef and red pepper flakes.
Ready to stir fry
Stir fry until the beef is just pink, this will take a couple of minutes. Remove the steak to a separate plate.
Add the remaining oil (1/2 tablespoon) to the wok and add the orange peel and onions.
Stir frying orange peel and onions
 Stir fry for one minute. Add the sauce and stir fry until the sauce boils and thickens about two minutes. Add the beef and stir fry until heated through. Serve over rice.
Orange peel beef-ready to eat!


Will I make this again? It was delicious. Amazing even. I snuck back to the kitchen to get seconds before the rest of my family. Once all of the prep work was done, it was easy. So, yes. I will make this again.

Monday, January 2, 2012

Oh My Darling Clementine Sorbet

Clementine sorbet in a clementine
The reason I started this blog was to document the recipes for the dishes that I wanted to make again. My earlier method was a scrap of paper with a list of ingredients - no measurements and no directions. Often, I would throw together a meal, we would love it, and I was unable to recreate it. I also wanted my daughter, Katie, to be able to make these dishes when she has her own home.
I ask a lot of "what ifs" as I cook. The answer is usually why not try it. Cooking and life is more exciting if you take risks. You should do things that scare you (well not like dangerous things) but things that make you grow as a person and as a cook. This blog records the "why nots" that work.
When I made this sorbet, I decided to try making a simple syrup with juice and sugar. I didn't use any water to make my simple syrup. [Gasp!] My hope was I would have a concentrated orange flavor. The result was the best orange, well, clementine sorbet ever. [Editor's note that last sentence should be read in the voice of David Tennant as Dr. Who].

Clementine Sorbet

Juice of 16 Clementines (2 3/4 cups/660 ml), Divided
1/2 Cup (100 g) of Granulated Sugar

Combine 3/4 cup (180 ml) of orange juice in a small saucepan with the sugar. Heat over low heat until the sugar is dissolved.
Heating the juice and sugar
Chill syrup and orange juice.
Chilled and ready for the ice cream maker
Once chilled, pour into ice cream maker and follow the manufactures' instructions.
Homemade sorbet
For a special twist, carefully hollow out a clementine and use it for your sorbet dish. Trust me, it's awesome.
Perfect sorbet bowls
The bottom line: will I make this again? Oh, yes. Every time I make orangecello, I will be juicing the zested oranges to make sorbet. Intense orange flavor and best orange sorbet ever.