Monday, October 31, 2011

Halloween Rum Cake

Our finished haunted castle
 This Halloween we made a Halloween Haunted Castle Rum Cake. I have several festive Bundt pans, and I am always looking for a reason to use them. I also am always looking for a reason to get more. I love them. 
I revised my standard rum cake this time. I wanted a lighter cake so I used a white cake mix and it did the trick. I also substituted melted butter for the oil and milk for the water. Finally, I wanted a stone-looking foundation to my castle, so I added the walnuts last instead of first.

Lighter Rum Cake

1 16.25 oz. (461g) Box of White Cake Mix
1  1 3/4 oz. (50 g) Box of Instant Vanilla Pudding Mix
1/2 Cup (120 ml) of Milk
1/2 Cup (115 g) of Butter, Melted and Cooled
1/2 Cup (120 ml) of Rum
4 Large Eggs
1 Cup (114 g) of Walnuts, Toasted and Finely Chopped

Preheat the oven to 325F/162C/Gas Mark 3. Prepare Bundt pan by greasing and flouring the pan.
The hardest part is preparing the pan
In a mixing bowl combine all of the ingredients except the eggs. Mix well. Add the eggs one at a time. Beat on medium speed for 3 minutes, scraping the bowl as needed.
A nice smooth batter
Pour the batter into the prepared Bundt pan. Top with the walnuts.

Ready for the oven
Bake for 45 minutes to an hour. The cake is done when a tooth pick insert into the center of the cake comes out clean. Let the cake cool in the pan for about 10 minutes.
Run a butter knife around the edges and invert onto a cake plate. With a skewer poke holes in the cake so the glaze can seep throughout the cake.

Rum Glaze

1/4 Cup (55 g) of Butter
1/8 Cup  (30 ml) of Water
1/2 Cup (100 g) of Sugar
1/4 Cup (60 ml) of Rum

I halved the normal amount of the glaze for the Halloween cake. Normally, I would double this recipe. Heat butter and water over medium heat. Once butter is melted, add sugar and bring to a boil. Boil for 3 minutes, stirring constantly. Remove from heat and carefully add the rum. Be careful, the mixture will produce a lot of stream.

The glaze
Pour the rummy goodness over the cake.
The castle before we added the decorations
Allow cake to cool completely and decorate. The decorating is the best part. We filled the center of the castle with mini marshmallows and dyed the marshmallows red. Then we had gummy worms coming out of the marshmallows. We turned large marshmallows into ghosts and used toothpicks to attach the ghosts to the castle. We stuck root beer barrels and mini Oreo cookies to the cookie sheet around the castle. Finally, we used orange and black icing on the turrets, doors, and windows. 

The bottom line: Will I make this again? Yes, but not until spring. The rum cake made with a yellow cake mix or the chocolate rum cake is more for cold winter days.

Saturday, October 29, 2011

Green Tomato Pickles

Green tomatoes ready to be pickled
I have never made green tomato pickles before. I am quite excited about it. I did a lot of research before making them. I decided base my pickles recipe on the Two Sisters' Green Tomato Pickles from One Big Table. Molly O'Neill traveled the country collecting recipes. The result was a cookbook full of 600 recipes with a portrait of its creator. It is a wonderful cookbook. Great recipes and fascinating stories.

I had some okra and decided to add those as well. I used my favorite lemon peppers.The alum is added to allow the pickles to stay crisp. Pickling salt does not have any iodine or anti-caking agent. The iodine may turn the pickles dark and the anti-caking agents may turn the pickling liquid cloudy. In a pinch Kosher salt can be substituted. Kosher salt is not as dense as pickling salt so a little more Kosher salt will have to added than the recipes calls for.

Green Tomato Pickles

For the Pickles
18 Cloves of Garlic, Peeled
A Handful of Lemon Peppers, Stemmed and Cut in Half
4 Tsp of Olive Oil
4 Tsp of Pickling Spice
4 Tsp of Alum
2 Pounds (.9 kg) of Green Tomatoes, Quartered
6 Small Okra Pods

For the Brine
1.5 Quarts (1.4 L) of Water
1 Quart (.9 L) of White Vinegar
3/8 Cup (80 g) of Pickling Salt

I used one quart (.9 L) jar and two pint (.47 L) jars. I sterilized the jars and split the pickle ingredients between the jars (I put twice as much in the larger jar).
To make the brine, heat up the brine ingredients in a large pot. Bring to a boil, then reduce the heat so the mixture simmers for 15 minutes.
Full jars
Fill the jars with hot brine up to 1/2 inch below the rim. Run a knife down and around the edge of each jar to release the bubbles. Seal the jars and cool to room temperature. Place the jars in the refrigerator and for two weeks before eating the pickles.
Finished jars

Thursday, October 27, 2011

Green Tomato Salsa

Green tomatoes
I love salsas. I especially love salsas my husband makes. He did not make this one, I did. But it was easy to make. The green tomatoes are firm and easy to chop. We have a lot of green tomatoes; the summer was just too hot and the tomatoes did not start producing until late in the season. It is a good thing that I love green tomatoes.  I used my beloved yellow peppers in this dish. I have a pitcher full and more on the way.

Green Tomato Salsa

1 Cup (155 g) of Diced Green Tomatoes
2 Large Cloves (10 g) of Garlic, Minced
1/4 Cup (5 g) of Cilantro, Thinly Sliced
1 Hot Pepper, Finely Diced
3 Tbsp of Lime Juice
1/2 Tsp Salt
1/2 Tsp of Sugar

Green tomato salsa
Combine all ingredients in a nonreactive bowl. Serve immediately or cover and refrigerate.
I have a pitcher of spicy lemon peppers so I used them in this salsa
The bottom line: Will I make this again? Yes. I love this.

Tuesday, October 25, 2011

Bloody Fingers

Finished fingers
These are the easiest Halloween treats to make. I use packaged lady fingers and decorate them with store-bought frosting. The result is amazing. To be completely honest, Katie came up with this idea. She did the bloody frosting with the red gel icing. It was pure mother daughter bonding time.
I tried to make my own blood colored frosting and failed miserably. I ended up buying red gel frosting. I will work on the perfect red colored icing for next year.

Bloody Fingers

Lady Fingers
Black Frosting
Red Frosting

Nail in process
Frost a nail on the tip of the lady finger. Next frost blood down the finger.

The bottom line: Will I make this again? yes, these are great and so easy. I love having them with my coffee in the morning.

Sunday, October 23, 2011

Halloween Cupcakes


Frosting cupcakes
 I love Halloween. My husband loves Halloween. My daughter loves Halloween. Our dogs do not love Halloween. They hate Halloween.They do love cupcakes, and I have to keep these out of their reach.

We usually go all out for Halloween. Unfortunately, we are not going all out with decorations this year but we are with food. This is the first of several Halloween posts. I usually I have ton of stuff going on this time of year. Sooooooo if I can cut some corners without sacrificing taste, I am going to.

Use your favorite cupcake recipe for the base. The cupcake recipe below makes a great cupcake. I am a huge fan of sour cream cupcakes because it makes the cupcakes so moist! Yummy! You could also add chocolate chips. I think mini chocolate chips would be perfect for these. It makes a ton of cupcake (24 cupcakes!). Enough for a class of kids, the teacher, and the baker! Not that you will want to share.

Chocolate Sour Cream Cupcakes

1 Box (18.25 oz/517 g) of Chocolate Cake Mix
16 oz. (455 g) of Sour Cream
1/4 Cup (55 g) of Butter, Melted
2 Large Eggs
1 Tsp of Vanilla

Preheat oven to 350F/176C/ Gas Mark 4.
Place all ingredients in a mixing bowl and mix on low until all ingredients are moistened. Increase speed to medium and beat for 3-4 minutes, scraping the bowl as necessary.
The batter should be smooth
Pour into muffin tins or muffin tins lined with paper or foil liners. Fill each cup 2/3 of the way full.  Bake for 25 minutes until wooden pick inserted into the center of the cupcakes comes out clean. Allow to cool completely. (They are also really good warm-- but don't ice them when they are warm).
Yum! Chocolate cupcakes
My family hopes that we will have ugly ones that they get to eat. I expect to walk in and see my husband smashing one with his fist. (It would then be deemed an ugly cupcake and would get eaten).

Butter Cream Icing
I am opposed to bland tasting icing. This icing is amazing. The secret is to use half and half or cream not milk. Also butter is necessary for this recipe, not margarine. It is lovely. It makes just enough to ice the cupcakes. 
Butter Cream Frosting

1/4 Cup (55 g) of Butter, Softened

1 1/2 Cups (170 g) of Powdered Sugar

1 Tsp Vanilla Extract

2 Tbsp of Cream
or Half and Half
Beat the butter until creamy. Alternate adding the powdered sugar and the cream and extract. Scrape bowl and beat until creamy. Add more cream or sugar until you get the desired consistency. 

To frost the cupcakes

Spread the butter cream icing on each cupcake. Allow to dry.  Place black icing into a pastry bag with  the tip that makes straight lines. Make concentric circles with the black icing. 
It is like making a target out of icing

Before the icing hardens, take a butter knife or tooth pick and drag the icing from the middle to the outer circle. Repeat.
Steps in making a spiderweb
To make a spider, make a large dot of icing in the center and add four legs on each side.  
Add caption


The bottom line: Will we make these again? Yes and hopefully each year I will get better at decorating them.

Saturday, October 22, 2011

Basil Oil

Caprese salad drizzled with basil oil.
We have a lot of basil. I always plant too much. I am always in a rush at the end of the summer to use it all. This year I decided to infuse olive oil with basil. I was amazed at how easy it was.

Basil Oil

1 1/2 Cups (30 g)  of Lightly Packed Fresh Basil Leaves
1 Cup (240 ml) of Olive Oil

Rinse and dry basil leaves. Combine oil and basil in a food processor or blender and pulse so that the leaves are finely chopped but not puréed. 


Pour basil oil into a small saucepan and heat over medium heat, Stir occasionally until temperature reaches 165F/74C.

Remove from heat and allow to cool. Pour into nonreactive container, cover, and refrigerate overnight. Strain through a fine mesh strainer or several layers of cheesecloth.

Discard basil and store oil in the refrigerator.

The bottom line: Will I make this again? Yes, this time next year, I will be making more. 

Friday, October 21, 2011

Halloween Marshmallows (Amaretto Flavored)

A bat shaped marshmallow
These are so easy to make and so much better than store bought. We used our standard marshmallow recipe available here: Homemade Marshmallows.
We have a family debate every time I make marshmallows over which flavoring to use and whether or not to add food coloring. We decided not to add food coloring. If you are going to use food coloring add it right after you add the oh so hot mixture to the gelatin.
After much discussion, we decided on amaretto flavored marshmallows. We substituted 3 teaspoons of amaretto and 1 teaspoon of almond extract for the vanilla extract.

Once the marshmallows were made, I "poured" them into a large baking pan that had been greased and coated with a mixture of powdered sugar and corn starch. I let the marshmallow sit out uncovered overnight. In the morning I figured out which cookie cutters I was going to use. I sprayed part of the cookie cutters with cooking spray and part were dipped in the corn starch powdered sugar mixture. I wanted to see which cookie cutters worked better. Surprisingly, there really wasn't a noticeable difference.
It took some work to get the cookie cutters to cut through all of the marshmallows
Instead of trying to pull the marshmallows out with the cookie cutters, I decided to remove the marshmallows around the cookie cutters. It worked like a charm.
Removing the marshmallows around the cookie cutters worked well
The result is Halloween shaped marshmallows. After pushing the marshmallows out of the cookie cutters, I dipped the edges in the corn starch and powdered sugar mixture. The leftover pieces will be used for hot cocoa.
Halloween shaped marshmallows

The bottom line: Will I make these again. Yes, my daughter begs me to make these. I think the Christmas marshmallows will be peppermint flavored. For Katie's birthday she will probably have her name in purple marshmallows on top of her cake. The possibilities are endless.

Thursday, October 20, 2011

Caprese Pasta Salad

Pasta salad
 Time to use the basil, a light freeze is on it way. What better way than a wonderful caprese pasta salad? The beautiful summer tomatoes are pretty much gone. I have a couple of green tomatoes on my plants but nothing ripe. So I decided to use a mixture of grape and cherry tomatoes. Not as good as a homegrown tomato but still good.

Caprese Pasta Salad

16 oz (455 g) of Pasta
1 Cup (150 g) of Tomatoes, Cut in Half
8 oz. (225 g) of Mozzarella, Cut into Bite-Size Pieces
One Handful of Basil, Thinly Sliced
Salt, To Taste
Pepper, To Taste
Vinaigrette (1/4 Cup (60 ml) of Balsamic Vinegar with 1/2 Cup (120 ml) of Olive Oil Slowly whisked in)

Cook the pasta according to package directions and rinse with cold water.
One cup of tomatoes
In a large pasta bowl combine tomatoes, mozzarella and basil.

Tomatoes, mozzarella and basil
Salt and pepper liberally. Add the pasta and stir to combine.
Vinaigrette- vinegar and oil whisked together
Finally toss with the dressing.

Will I make this again? Yes, this is one of the few fresh tomato pastas I will eat in the winter. The balsamic vinegar adds a sweetness and makes up for a lack of sun ripened tomatoes. As long as I have fresh basil (which you can find in the winter) and cherry tomatoes, this pasta salad is a winner.

Monday, October 17, 2011

Arugula Mascarpone Pesto

Arugula pesto
 We have some gorgeous arugula growing in our yard. I love the strong peppery taste of arugula. It is starting to get cold and it is time to use the arugula.
I decided to make pesto. I was a little worried that the arugula would be too strong, so I decided to balance the peppery taste with mascarpone. Yes, mascarpone. Yum.... I love mascarpone cheese.
I make my pesto differently than most people. I add the arugula (or basil or parsley or spinach) last. I don't want to over process the arugula.You may also use walnuts, almonds, or hazelnuts instead of pine nuts.If you are serving this with pasta, reserve about a cup of pasta water and add about a tablespoon of the pasta water to each bowl of pasta when you mix the pasta with the pesto.

Pesto

1/2 Cup (68 g) Pine Nuts, Lightly Toasted
1/2 Cup (100 g) of Parmesan Cheese
4 Cloves of Garlic
1/4 Cup (60 ml) of Olive Oil
2 Handfuls (56 g) of Arugula
1/2 Cup (113 g) of Mascarpone Cheese

Combine pine nuts, cheese, and garlic in a food processor and process until smooth.
Processed pine nuts, garlic, and cheese
Slowly add olive oil until well combined. Add arugula and process until arugula is chopped and well mixed.
Arugula waiting to be mixed in
Place pesto into a bowl and fold in the mascarpone.
Fold in mascarpone cheese
Final pesto
The bottom line: will we make this again? Yes, I like the peppery taste of the arugula and the creaminess that the macarpone adds.

Saturday, October 15, 2011

Bringing Our Garden Inside

My all time favorite type of hot peppers
It is always a sad day when I dig up some of our outside plants and try to overwinter them. I also bring in our house plants that have enjoyed the summer outdoors. I am a little worried this year because I have several Christmas cacti and an orchid about to bloom.
This is the first year that I am going to try to keep basil and lemon peppers alive. I also brought rosemary, lemon grass, and parsley inside. I am fairly certain that they will overwinter well with the grow lights. In past winters I have kept lemon grass alive over the winter in a sunny window.
I also collected seeds for next year. I have tons of lemon pepper, basil, okra and marigold seeds. Soon I will be planning next year's garden.
Part of the plants I brought inside
I also brought our garden markers inside. I made them with our neighbor, Gail, artist extraordinaire. Gail kindly lent me the use of her art studio, materials, and most importantly, her expertise. Also she took care of all of the firing in the kiln. The result was these amazing garden markers.  They will be back in the garden in the spring. For the winter, I think I am going to put them in a vase to remind me that spring is just around the corner.
My garden markers ready for next year
The next big project is grow lights. There is not enough light in my office for the jungle of plants that are now inside. I am trying to decide between LED and florescent. If anyone out there has any brilliant ideas for great but inexpensive grow lights, I would love to hear them.

The final plant project will be to set up our hydroponics set. I found one on the clearance rack last year. I hope it works.  I think it will be a great science project for Katie. Hopefully I can tie it in with a biology lesson.

Friday, October 14, 2011

Broccoli Cauliflower Salad

Broccoli and cauliflower ready to be made into salad
I love raw broccoli and cauliflower. I actually refuse to eat cooked broccoli; I can't stand the smell. This is my all-time favorite way to eat broccoli and cauliflower. Since, cauliflower is in season, I decided to make one of my favorite salads and measure the ingredients and write done the process. Since, I have never measured the ingredients before, it is obviously a flexible salad. You can add a little more or less of several ingredients and it will still be great.
A note on toasting pine nuts, watch them.  They quickly go from lightly toasted to burnt bits. I will start working on something else and forget about the pine nuts and then they burn. The birds seem to like burnt nuts but I would rather give them bird seed.

Broccoli Cauliflower Salad

1 Head of Broccoli, Cut into Bite Sized Pieces
1 Head of Cauliflower, Cut into Bite Sized Pieces
1/4 Cup (45 g) of Sweet Onion, Diced
1/2 Cup (60 g) of Craisins or Raisins, Optional
1 Cup of Mayonnaise (I Use Low-Fat)
1/4 Cup (50 g) of Granulated Sugar
3 Tbsp of White Vinegar (or Rice Vinegar)
1/2 Cup of Sunflower Seeds (70 g), Pine Nuts (70 g), or Slivered Almonds (85 g), Lightly Toasted
6 Slices of Bacon, Crumbled

Place the broccoli, cauliflower, onions, and craisins in a large bowl. In a separate bowl whisk together the mayonnaise, sugar, and vinegar.
Ready to whisk
Pour the dressing over the veggies and stir to combine. Add the nuts and the bacon and refrigerate until ready to serve.
The broccoli cauliflower salad is so pretty with the craisins
The bottom line: Will I make this again? Yes, this does not last long in our house.

Tuesday, October 11, 2011

Hard Cider

Heating the cider and the sugar
I love hard cider. This year we decided to make our own. Why? Because I love the beer we brew and wanted to see if we would love our homemade cider. I usually drink Woodchuck cider so I did a search for Woodchuck recipes. You guessed it, I came up with a bunch of recipes for groundhogs. Yuck! I never did find a recipe for Woodchuck Cider but I did find all sorts of methods for making hard cider. I found everything from leaving it out on the kitchen counter to naturally ferment to complex thirty step processes. I decided to try a fairly simple process: combining one gallon of cider with sugar and adding it to the rest of the cider, pitching the yeast, fermenting the cider, and then a secondary fermentation it in a carboy. Here is my recipe-- of course I won't know for a while if it worked or not. Feel free to take the leap with me!

Hard Cider

Ingredients
5 Gallons (19 L) of Apple Cider (See huge important note below)
4 Lb (1.8 kg) of Sugar
1 Package of Liquid Yeast

Special Equipment
1 Fermenting Bucket
1 Carboy
Liquid cider yeast in a smack pack
We took one gallon (3.78 L)  of apple cider and dumped it in a large stock pot with 4 pounds (1.8 kg) of sugar. We heated the apple cider until the sugar dissolved. (Adding sugar at the beginning increases the alcohol content of the cider not the sweetness). Then we dumped the hot sugar cider mixture and the remaining apple cider into a fermenting bucket. Once the mixture was 75F/21C we pitched the yeast. Now, we wait to see if the wee yeasties multiply.
After about four weeks, we will move the cider into a carboy and allow it to secondary ferment for about eight weeks.
The big question will be whether we want sparking cider or not. If we decide we want sparkling cider we will add 3/4 cup (180 ml) of honey or 3/4 cup (165 g) of brown sugar to 1 cup (240 ml) of water and bring the mixture to a boil. Once it is cooled, we will add it to the cider mixture right before we bottle it.
Everything is ready for the cider to be added
*****Huge Important Note About the Apple Cider**** For the apple cider to ferment you need the yeast to multiple and turn the sugar into alcohol (and carbon dioxide). The necessary chemical reaction will not take place if you have preservatives like sodium benzoate or potassium sorbate in your cider.

Friday, October 7, 2011

Big Bob Gibson's White Sauce

Smoked chicken with white sauce
 While I was going up, my family moved to different regions of the country. This provided me with the opportunity to fall in love with all kinds of food. One of my first experiences with barbecue was Big Bob Gibson BBQ in Decatur, Alabama. It wasn't their ribs that I loved, but their smoked chicken with white sauce. My family loves this sauce and we use it on pork as well as chicken. But the smoked chicken with white sauce is my favorite. Here is my version of their sauce. 

White Sauce for Chicken

1 Cup (239 g) of Mayonnaise (Some people swear by Miracle Whip instead of mayo but I use Hellmann's Light Mayo)
1/2 Cup (120 ml) of Apple Cider Vinegar
1/2 Tsp to 1 Tsp Prepared Horseradish
1/4 Tsp Cayenne
1 Tsp Salt
1/2 Tsp Freshly Ground Pepper

Combine all of the ingredients in a jar with a lid and shake to combine.
A jar of my version of Big Bob Gibson's BBQ sauce
Refrigerate for at least an hour. Baste the chicken with the white sauce a couple minutes before removing from the grill, use as a dipping sauce for chicken, or mix with shredded chicken.
Smoked chicken ready for sauce!
We use it as a dipping sauce for pulled pork. It is also good as a coleslaw sauce.

Tuesday, October 4, 2011

Homemade Egg Noodles

Homemade noodles
When I was little my mom made me chicken noodle soup (homemade) and poached eggs when I was sick. I am not sick very often but when I am I want my mom, chicken noodle soup, and poached eggs. Ok, I can live without the poached eggs and my mom shouldn't have to drop everything and come make me chicken noodle soup (I wish she would); so I make my own chicken noodle soup. (Grumble....) I also make it for my family when they are sick (Grumble....) But it always makes my feel better and transports me to my childhood watching my mom make me chicken noodle soup. The catch is the noodle have to be homemade. It is not as hard as you think. I can make them while I am deathly ill (a bit of an exaggeration) you can too. I will warn you, once you make them you will always want homemade egg noodles in your soup. If someone besides me is sick, I will add dried herbs to the noodles or cracked pepper (if I am sick I am working on autopilot). Oh! This is important, try not to overwork the dough. Just do the bare minimum of mixing.

Egg Noodles

1 1/2 Cups (190 g) of Unbleached Flour
1 Tbsp of Butter
1 Tsp of Salt (Omit if you are using salted butter)
1 Tsp of Dried Herbs (Optional, Your Choice)
2 Eggs, Slightly Beaten
0-2 Tbsp of Milk

Combine flour, salt, and butter with a pastry cutter or your fingers until well combined.
Cutting the butter into the flour
At this point add the dried herbs, if you are using them. Make a well in the center of the flour and add the eggs.
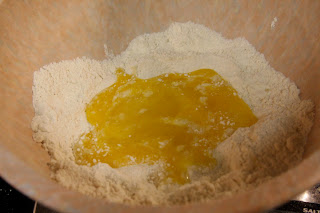
Beaten eggs in the well.

With a fork, gently mix in part of the eggs with part of the flour until combined.
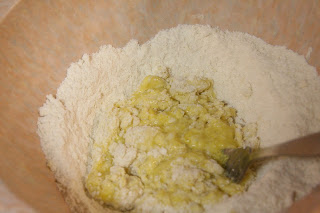
Slowly mixing the egg with the flour

Once all of the egg is mixed in with the flour, test the dough. If it is not forming a ball, add a bit of milk until a ball forms. You may not need any milk at all.

Cut the ball into four pieces and roll one piece out on a lightly floured board. (I usually place a piece of wax paper on the board and then flour it and roll out the dough on the wax paper). The dough will be sticky so you may have to add a little more flour. Roll out the dough paper thin. Set aside and work on the next piece of dough.
Roll out the dough so that it is paper thin
Let the dough rest for about 20 minutes, but do not let the dough dry out too much. Cut the dough into thin strips (I use a pizza cutter for this. It works magic). I don't worry about uniformity. I like my noodles to be different sizes. If you want perfect noodles use a rule to measure your cuts.
All different sizes of noodles
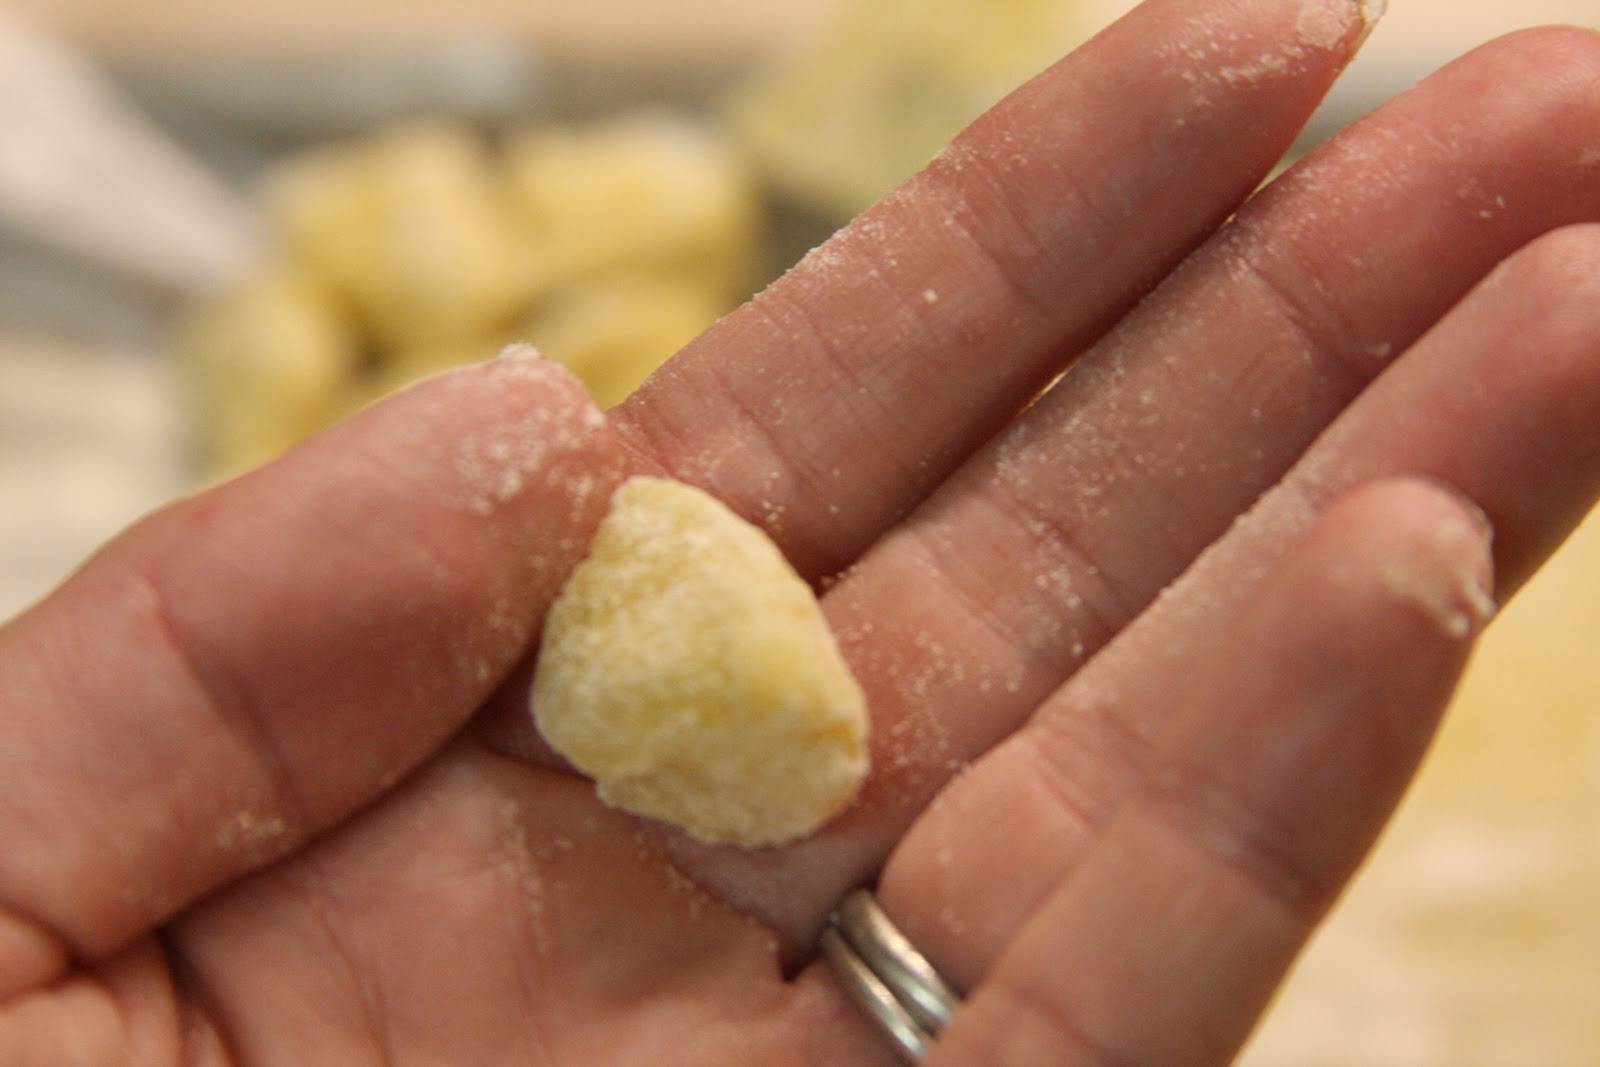
Roll some pieces of dough into small balls (for dumplings).
Dumplings are my favorite
Drop the noodles into boiling water, broth, or soup and boil for about 5 minutes. (Test at minute increments just to be sure). You also want to gently stir the noodles so they separate.
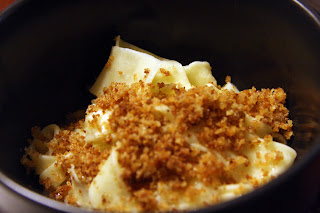
Egg noodles topped with buttered and toasted bread crumbs
Looking for an incredible way to serve them? Boil them in water, drain, and serve topped with buttered bread crumbs (I wish I could take credit for this gem but it is my mom's recipe).  So so good!
The bottom line: will I make this again? Yes, I even make these when everyone is healthy.
Use a ravioli cutter to create elegant noodles